Blog

  • Eggplant Parmesan Recipe: A Rustic Twist on a Classic

    Eggplant Parmesan Recipe: A Rustic Twist on a Classic

    Eggplant Parmesan has a wild, unpredictable charm that makes me keep coming back. There’s something about the way the eggplant’s earthy bite pairs with gooey cheese and tangy tomato sauce that’s endlessly satisfying. It’s a dish that invites improvisation — more herbs, a splash of wine, a different cheese — and that’s what keeps it exciting.

    Cooking it isn’t about perfection; it’s about the imperfect beauty of frying, layering, and baking. The process is a bit chaotic, but the smells… oh, the smells of bubbling cheese and roasting eggplant fill the kitchen with a cozy, nostalgic warmth. It’s a messy, delicious way to celebrate the humble eggplant.

    Why I Keep Coming Back to This Dish

    It’s a forgiving, soulful recipe that adapts to what I have on hand. The smell of frying eggplant and bubbling cheese always brings a sense of home. Plus, it’s versatile — I can add fresh herbs or switch cheeses — making each attempt uniquely mine.

    Breaking Down the Eggplant Parmesan Essentials

    • Eggplants: I prefer long, slender ones for uniform slices. Their slightly bitter skin adds depth. Swap with zucchini for a lighter version.: The backbone of the dish, eggplants’ spongy flesh soaks up flavors and crisps up beautifully.
    • Breadcrumbs: Use panko for extra crunch, seasoned with garlic powder and herbs. Feel free to add a pinch of cayenne for heat.: Gives the coating that satisfying crunch and golden color.
    • Mozzarella: Melty, gooey, and mild, it’s the ultimate comfort cheese. Substitute with provolone for a sharper bite.: Creates that luscious, stringy top that’s hard to resist.
    • Parmesan: Sharp, salty, and nutty, it adds a punch of flavor. Pecorino Romano can stand in if needed.: A sprinkle of this cheese on top brings depth and a salty crunch.
    • Tomato sauce: Fresh or jarred, it’s the flavor base. Look for bright, tangy varieties, or make your own with ripe tomatoes.: The tangy layer that balances richness and ties everything together.

    Tools of the Trade for Eggplant Parmesan

    • Baking dish (9×13 inch): To layer and bake the assembled eggplant Parmesan.
    • Large skillet: For frying the breaded eggplant slices.
    • Cooling rack or paper towels: To drain excess oil after frying.
    • Mixing bowls: For preparing the breading station and sauces.
    • Sharp knife: For slicing eggplants evenly.
    • Tongs: To handle hot slices safely.

    Crafting Eggplant Parmesan from Scratch

    Step 1: Preheat your oven to 200°C (390°F).

    Step 2: Slice eggplants into 1/2 inch thick rounds. Salt them generously and let sit for 20 minutes to draw out excess moisture.

    Step 3: Rinse the eggplant slices and pat dry. Set up a breading station with beaten eggs, seasoned breadcrumbs, and grated Parmesan.

    Step 4: Dip each eggplant slice into the egg wash, then coat thoroughly with breadcrumbs.

    Step 5: Heat a generous layer of olive oil in a large skillet over medium heat (about 160°C/320°F).

    Step 6: Fry eggplant slices in batches until golden brown, about 3-4 minutes per side. Drain on paper towels.

    Cooking Wisdom for Eggplant Parmesan

    • Eggplant slices should be golden and crispy, not soggy or burnt.
    • Cheese should be bubbling and just starting to brown on top.
    • The eggplant should feel tender but hold its shape when pierced.
    • Oiling the pan enough to sizzle when eggplant hits it prevents sticking.

    Common Pitfalls and How to Dodge Them

    • Oil too hot, eggplant burns before crisping.? Use a thermometer to keep oil at 160°C (320°F). If too hot, eggplant burns.
    • Eggplant remains soggy after frying.? Salt eggplant slices early, then rinse and dry thoroughly. If not, they stay soggy.
    • Uneven baking and soggy layers.? Layer sauce and cheese evenly. If too thick, it becomes mushy.
    • Greasy final dish.? Don’t skip draining fried slices. Excess oil ruins texture.

    Eggplant Parmesan

    Eggplant Parmesan is a hearty dish featuring breaded and fried eggplant slices layered with tangy tomato sauce and gooey melted cheese. The process involves frying, layering, and baking, resulting in a crispy, bubbling, and golden final appearance that’s both comforting and visually appealing.
    Prep Time 40 minutes
    Cook Time 30 minutes
    Total Time 1 hour 10 minutes
    Servings: 6
    Course: Main Course
    Cuisine: Italian
    Calories: 350

    Ingredients
      

    • 2 large eggplants long, slender preferred
    • 2 cups panko breadcrumbs seasoned with garlic powder and herbs
    • 1/2 cup Parmesan cheese grated
    • 2 cups tomato sauce bright and tangy
    • 16 oz mozzarella cheese shredded
    • 3 eggs eggs beaten
    • 2 tablespoons olive oil for frying
    • to taste salt for salting eggplant

    Equipment

    • Baking dish (9×13 inch)
    • Large skillet
    • Cooling rack or paper towels
    • Mixing bowls
    • Sharp knife
    • Tongs

    Method
     

    1. Slice the eggplants into 1/2-inch thick rounds, then generously sprinkle with salt and let sit for 20 minutes to draw out moisture and bitterness.
    2. Rinse the salted eggplant slices under cold water, then pat dry thoroughly with paper towels or a clean cloth.
    3. Set up a breading station with beaten eggs in one bowl, seasoned panko breadcrumbs mixed with Parmesan cheese in another, and a plate for breaded slices.
    4. Dip each eggplant slice into the beaten eggs, ensuring it’s coated evenly, then transfer to the breadcrumb mixture and press gently to coat thoroughly.
    5. Heat the olive oil in a large skillet over medium heat until it shimmers and sizzles when a breadcrumb is added.
    6. Fry the breaded eggplant slices in batches, about 3-4 minutes per side, until golden brown and crispy. Transfer to a cooling rack or paper towels to drain excess oil.
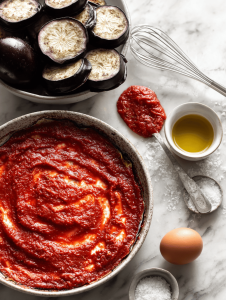
    7. Preheat your oven to 200°C (390°F). Spread a thin layer of tomato sauce in the bottom of the baking dish.
    8. Layer the fried eggplant slices over the sauce, then spoon more sauce over each layer, followed by a generous sprinkle of shredded mozzarella and a little Parmesan.
    9. Repeat the layering process until all eggplant slices are used, finishing with a layer of sauce and a final topping of mozzarella and Parmesan.
    10. Bake uncovered in the preheated oven for about 30 minutes, until the cheese is bubbly and golden, and the edges are slightly crispy.
    11. Remove from the oven, let sit for 5 minutes, then serve hot, enjoying the crispy top, tender eggplant, and rich sauce.

    Notes

    For extra flavor, sprinkle fresh basil or herbs on top before serving. To make it lighter, bake without frying and use a baking sheet with parchment paper.
    This dish isn’t just about layering cheese and eggplant; it’s about embracing the mess, the smell of sizzling breading, and the forgiving nature of baked cheese. Feel free to add a splash of fresh basil or a drizzle of honey before serving — it’s the kind of comfort that makes you want to start again tomorrow. Serve it hot, with a side of crusty bread or a simple green salad, and enjoy the imperfect, soulful process.

  • Lady Gaga Pasta Recipes: An Unexpected Spin on Classic Comfort

    Lady Gaga Pasta Recipes: An Unexpected Spin on Classic Comfort

    Lady Gaga’s pasta recipes often get a reputation for being elaborate, but I find that her simplest ideas pack the most punch. It’s about taking a little chaos in the kitchen and turning it into something unexpectedly delightful. This dish is a perfect example, a messy, flavorful tribute to bold, unapologetic tastes.

    Why I keep coming back to this dish

    The instant burst of spicy, lemony flavors always surprises me. It’s imperfect and messy, just like real life. It feels like a little rebellion, a reminder that sometimes the best meals are the ones you throw together with your heart. Plus, it’s so fast to make, I can whip it up during chaos or calm.

    In-depth with the ingredients

    • Pasta (spaghetti or linguine): Al dente pasta provides the perfect base—slightly firm, never mushy.
    • Garlic: Fragrant and punchy, essential for that smoky aroma—use fresh, not jarred.
    • Chili flakes: Adds a spicy kick—adjust to your heat tolerance.
    • Olive oil: Rich and fruity, helps create that glossy, flavorful sauce.
    • Lemon juice: Brightens the whole dish—use fresh for the best zing.
    • Basil: Fresh and fragrant, adds a herbal, sweet contrast.
    • Pecorino cheese: Salty and sharp, balances the spice and acidity.

    Tools of the trade for this pasta

    • Large pot: Boils the pasta evenly and quickly.
    • Skillet or large frying pan: Sauté garlic and chili flakes, then toss pasta.
    • Tongs or pasta fork: Helps coat pasta in sauce without breaking it.
    • Lemon squeezer: Extracts bright juice to finish the dish.

    Step-by-step for the perfect Lady Gaga Pasta

    Step 1: Fill a large pot with water, add a generous pinch of salt, and bring to a rolling boil at 100°C / 212°F.

    Step 2: While waiting, prepare your sauce—sauté garlic and chili flakes in olive oil until fragrant, about 2 minutes, until the kitchen fills with a smoky aroma.

    Step 3: Add cooked pasta directly to the sauce, stirring vigorously to coat every strand evenly, letting it cook together for another minute.

    Step 4: Finish with a splash of lemon juice, a handful of fresh basil, and a sprinkle of Pecorino for that sharp, salty kick.

    Cooking checkpoints to keep in mind

    • Pasta should be al dente, with a slight bite—test a strand at 9 minutes.
    • Sauce should be fragrant and slightly thickened, about 3 minutes after adding pasta.
    • Lemon juice should brighten the dish without overpowering—add last for freshness.

    Common mistakes and how to fix them

    • Overcooked pasta becomes mushy.? Add more water and cook longer if pasta is underdone.
    • Sauce scorches or sticks to pan.? Reduce heat immediately if sauce starts to burn.
    • Sauce becomes gloopy or sticky.? Add a splash of pasta water if sauce thickens too much.
    • Lemon juice was added too early, losing brightness.? Stir in a bit more lemon if the dish tastes flat.

    Lady Gaga Spicy Lemon Pasta

    This bold and messy pasta dish combines al dente spaghetti with fragrant garlic, fiery chili flakes, and bright lemon juice, all tossed together in a glossy olive oil sauce. Finished with fresh basil and sharp Pecorino cheese, it offers a punchy, flavorful experience with a slightly sticky, appealing texture.
    Prep Time 5 minutes
    Cook Time 10 minutes
    Total Time 15 minutes
    Servings: 2
    Course: Main Course
    Cuisine: Italian
    Calories: 520

    Ingredients
      

    • 200 g spaghetti or linguine al dente
    • 4 cloves garlic fresh, minced
    • 1 teaspoon chili flakes adjust to taste
    • 3 tablespoons olive oil extra virgin preferred
    • 1 lemon lemon juice freshly squeezed
    • a handful fresh basil roughly chopped
    • 50 g Pecorino cheese grated

    Equipment

    • Large pot
    • Skillet or large frying pan
    • Tongs or pasta fork
    • Lemon squeezer

    Method
     

    1. Fill a large pot with water, add a generous pinch of salt, and bring it to a rolling boil.
    2. Add the pasta to the boiling water and cook until just al dente, about 9 minutes, until it has a slight bite and is firm to the bite.
    3. While the pasta cooks, heat the olive oil in a skillet over medium heat and add the minced garlic and chili flakes.
    4. Sauté for about 2 minutes until the garlic is fragrant and slightly golden, filling the kitchen with a smoky aroma.
    5. Drain the cooked pasta, reserving a small cup of the pasta water.
    6. Add the drained pasta directly into the skillet with the garlic and chili oil, tossing vigorously with tongs to coat each strand evenly.
    7. Pour in the freshly squeezed lemon juice and continue tossing to brighten the flavors, letting the mixture cook together for about a minute.
    8. Sprinkle in the chopped basil and grated Pecorino cheese, tossing again to distribute evenly and create a glossy, flavorful coating.
    9. If the sauce appears too thick or sticky, add a splash of reserved pasta water and toss again until smooth and shiny.
    10. Give everything a final toss, taste, and adjust seasoning if needed—more lemon or chili for extra punch.
    11. Serve immediately, spooning the vibrant, messy pasta onto plates, and enjoy the bold, spicy, lemony flavors that dance on your palate.
    This pasta is all about bold flavors meeting a messy, heartfelt presentation. Don’t be afraid to toss in your favorite herbs or a dash of hot sauce—make it yours. It’s a dish that tastes like a little chaos and a lot of love, perfect for when you want something soulful and quick.

  • Snoop Dogg’s Fried Bologna Sandwich: A Flavorful Tossback with a Kick of Nostalgia

    Snoop Dogg’s Fried Bologna Sandwich: A Flavorful Tossback with a Kick of Nostalgia

    The fried bologna sandwich is a throwback that never gets old. It’s a simple, no-fuss meal that packs a punch of flavor with minimal effort. I love how the crispy edges of the bologna contrast with the soft bread, creating a perfect bite every time.

    Why This Sandwich Just Might Stay in Your Rotation

    It’s quick, honest, and hits all the right notes—crispy, juicy, with a smoky punch. No matter how many fancy options exist, this classic keeps calling me back when I need comfort or a reminder of simpler days.

    Breaking Down the Simple Goodness

    • Bologna: The star—crispy edges with a juicy, smoky interior. Swap for turkey or veggie slices for a leaner vibe.
    • Bread: Toasted to a golden crunch, providing a sturdy base. Brioche or sourdough works if you want a richer bite.
    • Mustard or pickles: Add a tangy contrast that cuts through the richness; skip if you prefer a milder taste.
    • Mayonnaise: Creamy and smooth, balances the saltiness. Try spicy mayo for an extra kick.
    • Butter or oil: For frying; use butter for flavor, oil for higher smoke point.

    Tools of the Trade for the Perfect Sandwich

    • Non-stick skillet: To fry the bologna evenly without sticking.
    • Spatula: To flip the slices gently and transfer them without breaking.
    • Toaster or oven: To toast the bread to golden perfection.
    • Paper towels: To drain excess grease from the fried bologna.

    Step-by-step to a Perfect Fried Bologna Sandwich

    Step 1: Start by heating a non-stick skillet over medium heat, about 160°C (320°F).

    Step 2: Place the sliced bologna in the pan and cook until edges crisp up, about 2-3 minutes per side.

    Step 3: While the bologna fries, toast your bread until golden and slightly crunchy.

    Step 4: Once the bologna is crispy, transfer it onto the toasted bread, and add your favorite toppings like mustard or pickles.

    Step 5: Serve hot, with the pan drippings or a smear of mayo for extra richness.

    Crispy, Juicy, and Just Right: Cooking Checkpoints

    • Bologna edges are golden and crispy, not burnt or soggy.
    • Pan juices should be bubbling and slightly caramelized, not burnt.
    • Bread is toasted to a golden hue, not pale or burnt.
    • Bologna is cooked through, with a firm yet juicy texture.

    Common Pitfalls and How to Fix Them

    • Cooking on high heat.? Use medium heat to prevent burning; lower if edges darken too quickly.
    • Breaking the slices while flipping.? Flip bologna carefully to keep slices intact.
    • Over-toasting or burning the bread.? Toast bread until golden, not burnt.
    • Leaving greasy bologna on the bread.? Drain excess grease on paper towels.

    Fried Bologna Sandwich

    This classic fried bologna sandwich features crispy edges of smoky, juicy bologna slices nestled between toasted bread. The dish is simple to prepare, with frying, toasting, and assembling creating a satisfying contrast of textures—crunchy, tender, and flavorful. It’s a nostalgic comfort food with bold flavors and a hearty bite.
    Prep Time 5 minutes
    Cook Time 10 minutes
    Total Time 15 minutes
    Servings: 2
    Course: Main Course
    Cuisine: American
    Calories: 400

    Ingredients
      

    • 4 slices bologna preferably sliced
    • 4 slices bread your choice of bread, like white, sourdough, or brioche
    • 1 tbsp butter or oil for frying the bologna
    • 2 tsp mustard or pickles optional toppings
    • 1 tbsp mayonnaise or spicy mayo for extra flavor

    Equipment

    • Non-stick skillet
    • Spatula
    • Toaster or oven
    • Paper towels

    Method
     

    1. Place the bologna slices on a plate, ready to fry, and preheat your skillet over medium heat.
    2. Add butter or oil to the skillet, letting it melt and heat up until shimmering and fragrant.
    3. Carefully place the bologna slices in the hot skillet, laying them flat without overlapping, and cook for about 2-3 minutes until the edges turn crispy and golden.
    4. Flip the slices gently using a spatula and cook for another 2-3 minutes, ensuring both sides are crispy and browned.
    5. While the bologna fries, toast your bread slices until golden and slightly crunchy, either in a toaster or oven.
    6. Transfer the crispy bologna onto paper towels to drain excess grease, then set aside.
    7. Spread mayonnaise on one side of each toasted bread slice for a creamy base.
    8. Layer the crispy bologna slices on one piece of bread, adding mustard or pickles if desired for added tang.
    9. Top with the second slice of bread, mayonnaise side down, pressing gently to secure the sandwich.
    10. Cut the sandwich in half if desired and serve immediately while the bologna is crispy and hot.

    Notes

    For extra flavor, try adding a slice of cheese or a dash of hot sauce. Keep an eye on the bologna to prevent burning; adjust heat as needed.
    This sandwich isn’t just a quick bite; it’s a little piece of childhood, reimagined with a smoky, crispy edge that makes you forget about gourmet fuss. It’s honest, messy, and totally satisfying—perfect for lazy weekends or when you need that nostalgic jolt. Feel free to personalize it—add a dash of hot sauce or a slice of cheese to make it your own.

  • Jennifer Aniston Salad: A Fresh Spin on Comfort and Nostalgia

    Jennifer Aniston Salad: A Fresh Spin on Comfort and Nostalgia

    I’ve always loved the idea of a salad that’s more than just greens. Jennifer Aniston’s take on a hearty, balanced bowl feels like a cozy hug with a crunch. It’s the kind of dish that feels like a little celebration of simple, good ingredients.
    What really makes it stand out is the mix of textures and flavors—crunchy walnuts, juicy tomatoes, salty feta, and tender chicken. It’s a dish that’s familiar but with a twist that keeps you coming back.

    Why I keep coming back to this salad

    Because it’s endlessly adaptable, with textures that keep each bite interesting. It’s a dish that feels like a comforting hug but also energizes you. No matter how chaotic the day, it’s quick to assemble and always satisfying.

    Inside the ingredients of Jennifer’s Salad

    • Mixed greens: A fresh, crisp base—use arugula, spinach, or romaine for different textures.
    • Cherry tomatoes: Juicy burst of sweetness—try heirloom for more color and flavor.
    • Cucumber: Cool, crunchy, adds a refreshing note—peel or leave the skin for extra texture.
    • Grilled chicken: Tender, smoky slices—pound to even thickness for quick, uniform cooking.
    • Feta cheese: Salty, creamy—opt for a block and crumble just before serving.
    • Walnuts: Toasted until fragrant—adds crunch and a nutty richness.
    • Olive oil & lemon juice: Simple dressing—bright, with a slight sharpness to balance the richness.

    Tools of the trade for this salad

    • Skillet: To toast the walnuts and grill the chicken.
    • Large mixing bowl: To toss and combine all salad ingredients.
    • Chef’s knife: To chop vegetables and chicken.
    • Cutting board: Provides a safe surface for chopping.
    • Measuring spoons: To measure oil, lemon juice, and seasonings.

    Step-by-step to a Refreshing, Nutty Salad

    Step 1: Gather all ingredients before starting. It makes the process smoother and less chaotic.

    Step 2: Toast the walnuts in a dry skillet over medium heat, about 3-4 minutes, until fragrant and slightly browned.

    Step 3: Mix the greens, cherry tomatoes, and cucumber in a large bowl. Toss gently to combine.

    Step 4: Add the grilled chicken slices and crumbled feta on top.

    Step 5: Dress the salad with olive oil, lemon juice, salt, and pepper. Toss again gently.

    Cooking checkpoints and tips

    • Walnut toast: they should smell rich and slightly smoky, not burnt.
    • Chicken grill: ensure the meat is cooked through—internal temp should reach 75°C (165°F).
    • Dressing: it should be bright and slightly tangy, not oily or dull.
    • Salad texture: greens should stay crisp and vibrant—don’t dress too early.

    Common mistakes and how to fix them

    • Greens look wilted or dull.? Add a splash of lemon juice to brighten dull greens.
    • Walnuts are too pale or not fragrant.? Toast walnuts longer, just until fragrant.
    • Chicken is undercooked or pink inside.? Cook chicken to 75°C (165°F), then rest before slicing.
    • Salad is soggy or wilted.? Toss salad just before serving to keep greens crisp.

    Jennifer’s Nutty Chicken Salad

    This hearty chicken salad combines tender grilled chicken, crisp greens, juicy cherry tomatoes, and crunchy toasted walnuts, all tossed in a bright lemon and olive oil dressing. The dish boasts a vibrant mix of textures and flavors, with creamy feta adding a salty richness and fresh vegetables providing crunch. It’s a colorful, satisfying bowl perfect for a quick, nourishing meal.
    Prep Time 15 minutes
    Cook Time 10 minutes
    Total Time 25 minutes
    Servings: 4
    Course: Main Course
    Cuisine: Healthy, Western
    Calories: 420

    Ingredients
      

    • 2 cups mixed greens arugula, spinach, or romaine
    • 1 cup cherry tomatoes halved
    • 1 cup cucumber sliced
    • 2 pieces boneless, skinless chicken breasts pounded to even thickness
    • 1/2 cup feta cheese crumbled
    • 1/3 cup walnuts toasted
    • 2 tablespoons olive oil for dressing
    • 1 tablespoon lemon juice freshly squeezed
    • to taste salt and pepper for seasoning

    Equipment

    • Skillet
    • Large mixing bowl
    • Chef’s knife
    • Cutting board
    • Measuring spoons

    Method
     

    1. Begin by toasting the walnuts in a dry skillet over medium heat, shaking occasionally, until fragrant and slightly browned, about 3-4 minutes. Remove and set aside.
    2. While the walnuts toast, pound the chicken breasts to an even thickness for uniform cooking. Season with a pinch of salt and pepper.
    3. Heat the skillet again over medium heat. Grill the chicken for about 4-5 minutes per side until cooked through and juices run clear. Once done, let rest for a few minutes before slicing.
    4. Chop the grilled chicken into strips and set aside.
    5. In a large mixing bowl, combine the greens, halved cherry tomatoes, and sliced cucumber. Toss gently to distribute evenly.
    6. Add the sliced grilled chicken and crumbled feta cheese on top of the greens mixture.
    7. In a small bowl, whisk together olive oil, lemon juice, salt, and pepper to create the dressing. Pour over the salad.
    8. Toast the walnuts until fragrant, then scatter them over the salad for added crunch.
    9. Toss the salad gently to combine all ingredients and coat everything with the dressing. Serve immediately for maximum crunch and freshness.

    Notes

    For extra flavor, add a squeeze of fresh lemon or a drizzle of honey to the dressing. Keep greens crisp by dressing just before serving.
    This salad is a reminder that simple ingredients can come together in a way that feels comforting yet vibrant. It’s perfect for a quick lunch or a casual dinner. Feel free to swap ingredients based on what’s in your fridge—more avocado, less feta, whatever makes it yours.

  • Hello world!

    Welcome to WordPress. This is your first post. Edit or delete it, then start writing!