Sometimes, I get stuck with a handful of cooked grains and a craving for something wholesome but quick. Stuffed peppers seem like a good way to reinvent leftovers, but I like to push the boundaries a little. Instead of just reheating rice, I mix it into a lively, herbaceous filling that makes me smile every time.
This recipe is my go-to when I want something nourishing, colorful, and a little unexpected. It’s imperfect, a bit messy, but always satisfying. Plus, the smell of peppers roasting with garlic and spices clinging to the air? It’s a small luxury I look forward to.
Why I Love Using Leftover Grain for Stuffed Peppers
Why this dish matters to me
- I love how versatile this dish is, fitting whatever leftovers I have on hand.
- There’s a nostalgic comfort in the aroma of peppers roasting with garlic—reminds me of family dinners.
- I feel a small thrill when I see the peppers puff up and caramelize slightly—proof I nailed the timing.
The story behind my favorite stuffed peppers
- This recipe was born from a kitchen experiment with leftover grains and the desire to make something bright and nourishing.
- One day, I was tired but craving something wholesome. Tossed everything in a pepper, and it turned out better than I expected.
- It’s become a go-to because it’s forgiving, quick, and endlessly customizable. Plus, the smell of roasted peppers is just so satisfying.
A little history and trivia about stuffed peppers
- Bell peppers are native to Central and South America, first cultivated over 7,000 years ago.
- Stuffed peppers appear in many cuisines, from Mediterranean to Middle Eastern, each with unique fillings.
- Vegan adaptations of classic stuffed peppers often replace cheese with nutritional yeast or vegan cheese for cheesy flavor.
- In some cultures, stuffed peppers are a celebration dish, symbolizing abundance and hospitality.
Ingredient insights & tweaks
- Bell peppers: Bright, firm, and glossy. If they’re soft or dull, skip or choose fresh ones.
- Cooked grains: Chewy and slightly sticky. Overcooked? Add a splash of broth to loosen the mixture.
- Herbs & spices: Fresh herbs add brightness, dried herbs deepen flavor. Adjust to taste and season generously.
- Lemon juice: Brightens the filling with a zing that balances richness. Use vinegar if lemon’s unavailable.
- Nuts or seeds: Add crunch and richness. Chopped walnuts or sunflower seeds work well for texture.
Spotlight on bell peppers and grains
Bell peppers:
- Their sweet, smoky aroma intensifies as they roast. Look for shiny, unblemished skins.
- A slight give when pressed indicates perfect doneness—firm but not hard.
Cooked grains:

- Their chewy texture absorbs flavors beautifully. Slightly toasty when stir-fried, adding depth.
- They should be fluffy and moist, not sticky or dry—overcooking makes them mushy.
Ingredient substitutions for your pantry and preferences
- Dairy-Free: Swap vegan cheese or nutritional yeast for cheesy flavor without dairy.
- Gluten-Free: Use certified gluten-free grains like millet or quinoa for a celiac-safe dish.
- Spice Variations: Add cayenne or smoked paprika for heat and smoky depth.
- Herb Choices: Swap parsley for cilantro or basil for different freshness.
- Grain Swap: Use lentils or chopped mushrooms instead of grains for a different texture.
Equipment & Tools
- Baking dish: Holds the peppers upright during baking
- Skillet: Sautéing the aromatics and grains
- Knife: Cutting peppers and chopping ingredients
- Spoon or spatula: Stuffing peppers and mixing filling
Step-by-step: How to make vegan stuffed peppers
- Preheat oven to 200°C (392°F).
- Cut the tops off peppers and remove seeds. Place upright in a baking dish.
- Heat a tablespoon of oil in a skillet over medium heat. Sauté chopped onion and garlic until translucent, about 5 minutes.
- Add the cooked grains, chopped herbs, and a squeeze of lemon juice. Season with salt and pepper. Stir well.
- Stuff each pepper with the grain mixture, pressing down slightly.
- Sprinkle a little nutritional yeast or vegan cheese on top for extra flavor.
- Bake for 20-25 minutes, until peppers are tender and filling is slightly browned on top.
- Remove from oven and let rest for 5 minutes before serving.
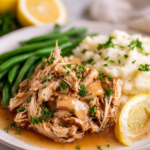
Let the peppers rest for 5 minutes to settle flavors. Serve warm, garnished with fresh herbs or a drizzle of olive oil.
How to Know It’s Done
- Peppers should be bright and firm before baking.
- Filling should be heated through and slightly browned on top.
- Peppers should be tender but not mushy after baking.
Stuffed Peppers with Herbed Grain Filling
Ingredients
Equipment
Method
- Preheat your oven to 200°C (392°F). Place the whole peppers on a baking sheet and roast for about 10 minutes, turning occasionally until the skins are slightly blistered and fragrant. Remove and set aside to cool slightly.
- While the peppers are cooling, heat a tablespoon of olive oil in a skillet over medium heat. Sauté chopped onion and minced garlic until translucent and fragrant, about 5 minutes. You’ll notice the onions turning golden and the garlic releasing a warm aroma.
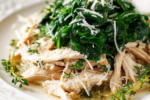
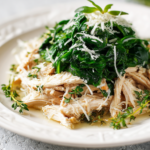
- Add the cooked grains to the skillet with the sautéed aromatics. Stir well to combine, allowing the grains to absorb the flavors and heat through. This step creates a chewy, flavorful stuffing that’s ready to be seasoned.
- Remove the roasted peppers from the oven and carefully cut off the tops with a sharp knife. Gently remove the seeds and membranes, creating a hollow cavity for the filling. Be gentle to keep the peppers intact but ensure they are clean inside.
- Mix chopped fresh herbs and a squeeze of lemon juice into the grain mixture. Season generously with salt and pepper, tasting and adjusting until the flavor feels bright and balanced. The herbs add a fresh, vibrant note that complements the roasted peppers.
- Stuff each pepper with the herbaceous grain mixture, pressing down gently to pack the filling inside. Fill to the top for a hearty presentation.
- If desired, sprinkle nutritional yeast or vegan cheese over the top of each stuffed pepper for an extra cheesy, savory touch. This adds a golden, bubbly finish after baking.
- Arrange the stuffed peppers upright in a baking dish. Cover loosely with foil and bake for 20-25 minutes, until the peppers are tender and the filling is heated through. You’ll notice the peppers slightly puffing and the tops browning a little.
- After baking, remove the foil and let the peppers rest for 5 minutes. This allows the flavors to settle and makes handling easier. The peppers should look vibrant and slightly caramelized on top.
- Serve the stuffed peppers warm, garnished with additional herbs if desired. Enjoy the colorful, flavorful dish that combines tender peppers with a hearty, herby filling.
Tips & tricks for perfect stuffed peppers
- Keep the filling moist but not soggy—use just enough lemon juice or broth.
- Roast peppers cut-side down first for better caramelization.
- Use a filling mixture that’s slightly looser than you think—it expands during baking.
- Sprinkle nutritional yeast on top before baking for extra umami.
- For a smoky flavor, toss peppers with smoked paprika before roasting.
Common mistakes and how to fix them
- FORGOT TO preheat the oven? Turn it on now, and cover peppers with foil to prevent drying.
- DUMPED too much water into filling? Drain excess or add a bit more grain to balance moisture.
- OVER-TORCHED the top? Cover with foil and bake a little longer, or broil briefly for a crispy top—watch closely.
- FELL apart when serving? Let the peppers rest for 5 minutes — they’ll hold together better.
Quick fixes when things go awry
- When peppers are too firm, cover with foil and bake 5 more minutes.
- Splash a little vinegar or lemon juice if filling tastes flat.
- Patch over cracked peppers with extra filling and bake longer.
- Shield peppers with foil if tops brown too quickly.
- When in doubt, reheat in a covered skillet with a splash of water to steam gently.
Make-ahead and storage tips
- Prepare the filling a day ahead; store in an airtight container in the fridge for up to 2 days.
- Stuffed peppers can be assembled a few hours before baking; keep refrigerated.
- Leftovers keep in the fridge for 3 days; reheat in the oven at 180°C (356°F) for 10 minutes.
- The flavor deepens overnight, making it even more satisfying the next day.
10 Practical Q&As About Vegan Stuffed Peppers
1. What size of peppers works best?
Use bell peppers about 8-10 cm in diameter, firm and glossy, with no soft spots.
2. How do I know when the filling is done?
Cook the filling until it’s heated through and slightly browned on top, around 10 minutes at 200°C (392°F).
3. Should I rest the peppers after baking?
Let the peppers rest for 5 minutes after baking; they’ll be easier to handle and the flavors will settle.
4. Can I swap the grains in the filling?
Use cooked quinoa or rice to keep the filling light yet satisfying. For a hearty touch, add chopped nuts or seeds.
5. What if the peppers aren’t soft enough?
If peppers aren’t tender after 20 minutes, cover with foil and cook another 5-10 minutes.
6. How can I brighten the flavor?
Add a splash of lemon juice or vinegar before baking for brightness and to balance flavors.
7. How long do leftovers last?
Store leftovers in an airtight container in the fridge for up to 3 days. Reheat in the oven at 180°C (356°F).
8. What’s the best tool to cut peppers?
Use a sharp paring knife or small serrated knife to cut peppers neatly and safely.
9. How do I prevent filling leaks?
If the filling leaks during baking, make sure peppers are upright and snug in the baking dish.

10. Should I taste the filling before stuffing?
Taste the filling before stuffing; adjust seasoning with salt, pepper, or herbs as needed.
There’s something comforting about these peppers, especially in a season when fresh produce is abundant. They’re versatile, forgiving, and surprisingly fast to throw together. I often find myself making a batch to keep in the fridge—perfect for busy days or when I need a meal that feels like a warm hug.
In the end, these stuffed peppers remind me that good food doesn’t need to be complicated. Just honest ingredients, a little love, and a dash of patience. They’re a gentle nudge to keep experimenting with what’s already in my kitchen.

Hi, I’m Mason Harper, the voice and heart behind Rooting in Freshness. I’m so glad you’re here. This space was born from my love for seasonal ingredients, simple cooking, and the belief that food tastes better when it’s grown, chosen, and prepared with intention. Rooting in Freshness is more than a food blog to me. It is a reflection of how I live, cook, and connect with the world around me.

Leave a Reply